Follow Me On Social Media!
Red Velvet Poke Cake Recipe: Irresistibly Moist and Decadent
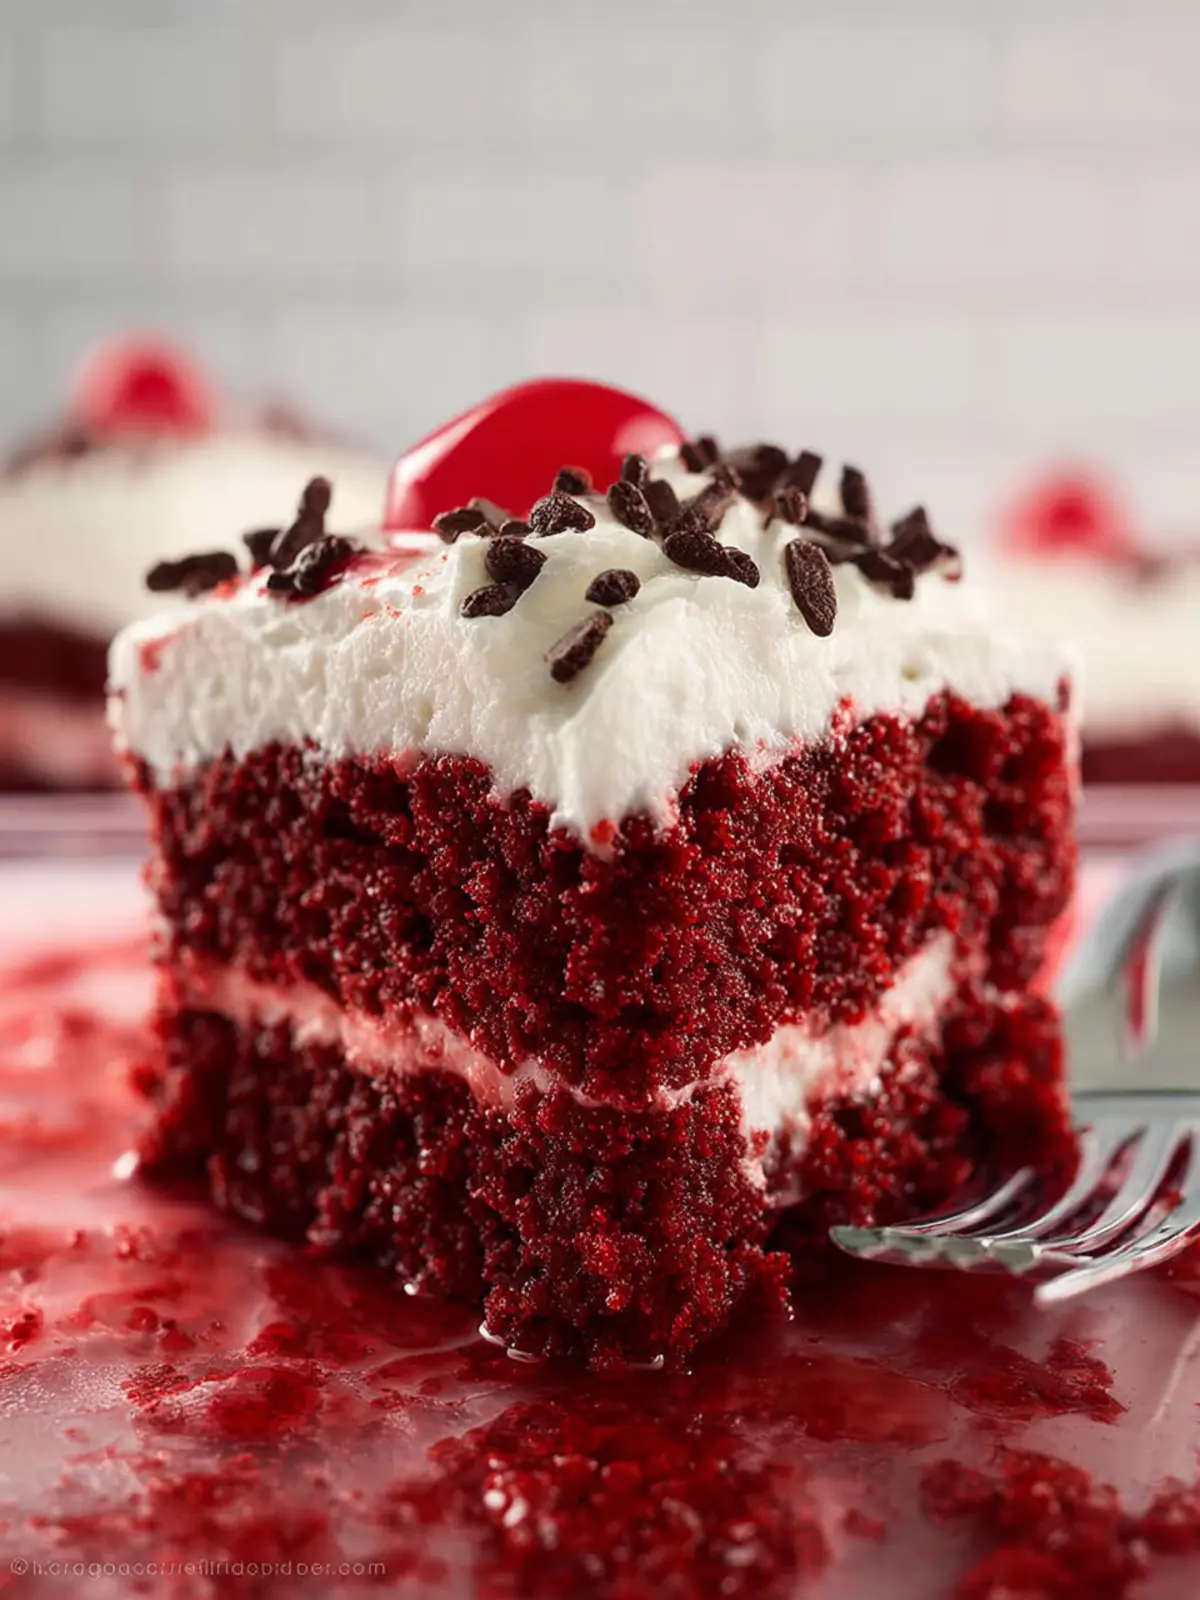
Introduction to Red Velvet Poke Cake Recipe
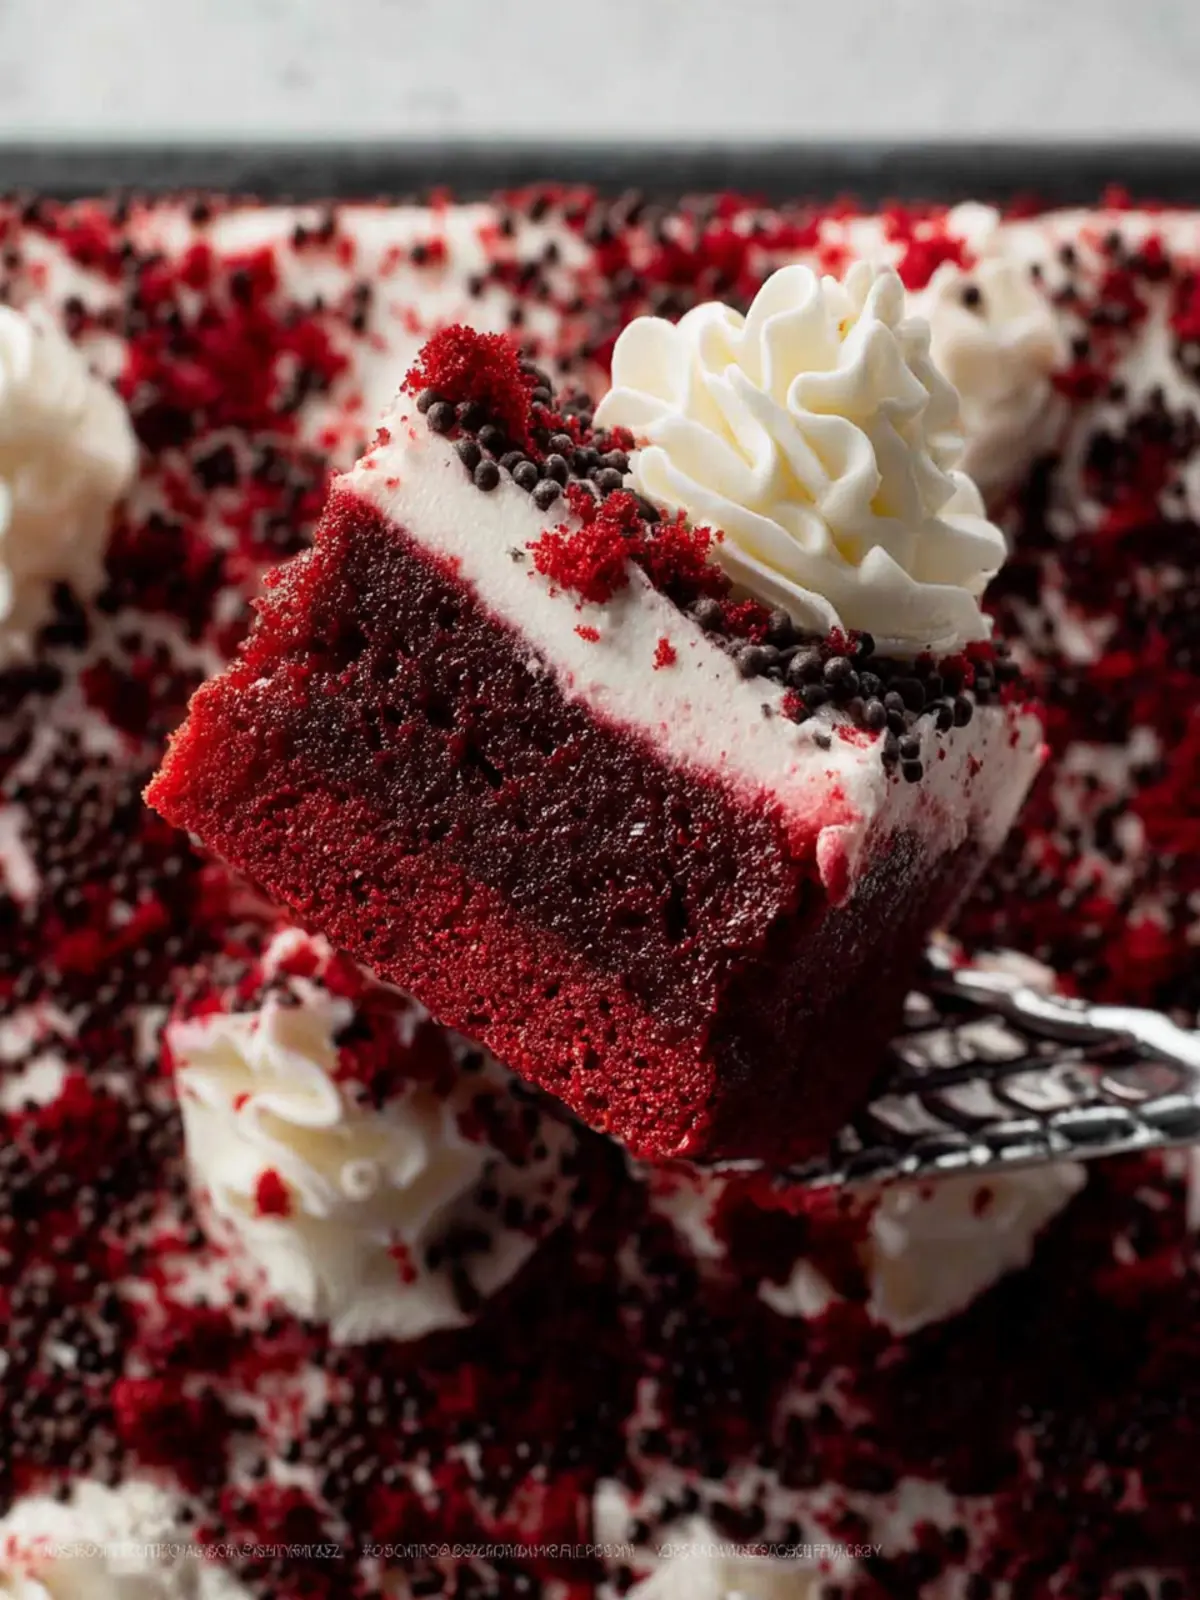
The journey of exploring a red velvet poke cake recipe begins with the alluring charm of its vibrant color and rich flavors that hint at beloved traditions. Picture this: a sunny afternoon, friends gathered around, laughter in the air, and this stunning cake taking center stage. Its striking red layers and creamy filling invoke a sense of celebration, making it a perfect treat for any occasion. Whether it’s a birthday bash, a holiday feast, or just a casual get-together, this cake turns dessert into an experience.
What makes Red Velvet Poke Cake so special? It’s a delightful twist on a classic dessert, offering much more than just a pretty face. The poke cake technique allows flavors to seep deep into the soft, moist layers, creating a symphony of tastes in every bite. As you slice into the cake, you’ll discover the luscious cream filling hidden within, making for an impressively satisfying treat that’s surprisingly simple to make.
In addition to its stunning appearance, the red velvet poke cake holds a special place in our hearts—it’s a sort of edible nostalgia. The rich cocoa flavor paired with the tang of buttermilk results in a moist cake that is hard to resist. Topped with a light cream cheese frosting, every bite bursts with a unique combination of flavors that keep you coming back for more.
Don’t be surprised if you find yourself reminiscing about your grandmother’s kitchen or college parties while savoring this cake. The red velvet poke cake isn’t just about taste; it’s also about connection, family, and creating lasting memories with loved ones. So, get your mixing bowls ready and prepare to whip up this irresistible dessert. By the end of this recipe, you’ll not only have a beautifully crafted cake, but you’ll also have the joy of shared moments that make life a little sweeter.
Key Ingredients for Red Velvet Poke Cake
Red velvet poke cake is a dessert that takes the classic flavor of red velvet and adds a delightful twist through its unique preparation. Every bite promises a delightful surprise, and that’s all thanks to a handful of key ingredients that are essential to achieving the perfect poke cake experience.
-
Red Velvet Cake Mix: The heart of this cake is the red velvet cake mix, which gives it that iconic reddish hue and rich, subtle cocoa flavor. I recommend going for a high-quality mix for the best results.
-
Eggs: Adding eggs to the cake mix not only provides moisture but also contributes to the structure of the cake. They help the cake rise beautifully for a light and fluffy texture.
-
Milk: Milk enhances the richness of the batter while also ensuring that the cake stays moist. Whole milk is preferable, but feel free to use any milk you have on hand.
-
Sweetened Condensed Milk: This is the star of the poke cake! When poured over the baked cake, it seeps into the holes, infusing every slice with a creamy sweetness that you won’t forget.
-
Cream Cheese: A must for the frosting! Cream cheese adds a tangy richness that perfectly balances the sweetness of the cake and complements its velvety texture.
-
Whipped Topping: Topping the cake off with whipped topping adds an airy lightness that contrasts beautifully with the dense cake layers.
With these ingredients, you’re well on your way to creating a show-stopping red velvet poke cake that will charm everyone at your gathering and keep them coming back for more!
Why You’ll Love This Recipe
The red velvet poke cake recipe is not just a dessert; it’s an experience that combines the whimsical excitement of childhood celebrations with the sophisticated richness of a modern treat. Imagine biting into a fluffy cake infused with a delightful cream cheese filling, each forkful revealing a burst of flavor that dances on your palate. This unique spin on the classic red velvet cake offers everything you love about it but with a fun twist—who doesn’t enjoy a cake that’s practically begging to be poked and filled with deliciousness?
Here’s why you’ll be excited to whip this up for your next gathering:
- Moist and Flavorful: The poke method ensures that every bite is saturated with the creamy goodness, keeping the cake beautifully moist.
- Eye-Catching Presentation: With its vibrant red hue and drizzled topping, this cake is bound to be a showstopper at any event.
- Simplicity: Even if baking isn’t your forte, this recipe is straightforward and approachable, making it perfect for bakers of all skill levels.
- Customization: Feel free to adapt the fillings or toppings to match your personal taste—think chocolate syrup, berries, or even cool whip!
This red velvet poke cake recipe merges festivity and flavor in a way that is sure to become a beloved favorite. Get ready to create sweet memories!

Tips for Making the Perfect Red Velvet Poke Cake
Creating a delectable red velvet poke cake is all about attention to detail and a sprinkle of love. This dessert has a special way of bringing people together, take it from someone who learned the craft during family gatherings. Here are some tips to guide you in your making process!
Choose Quality Ingredients
Using high-quality ingredients makes all the difference. Invest in pure vanilla extract for that rich flavor and opt for good-quality cocoa powder. A little extra effort here will elevate your cake dramatically.
Perfect Your Poke Holes
After baking your cake, allow it to cool slightly. Then, use a skewer or fork to gently poke holes across the surface, but don’t go overboard. Think of it like making tiny tunnels for the delicious filling to invade, ensuring every bite is moist and flavorful.
Timing Is Key
Pour your sweetened condensed milk over the cake while it’s still warm. This step lets the milk seep deep into those holes. Waiting too long could cause it to sit on top instead of soaking in.
Cool Before Frosting
After pouring in your filling, always refrigerate your cake before frosting it. This allows the flavors to meld and will result in a more stable cake when applying the cream cheese icing.
Serve with Style
Presentation matters! When serving your red velvet poke cake, consider garnishing with shaved chocolate or fresh berries. This not only adds visual appeal but enhances the delightful flavor profile.
By following these tips, your red velvet poke cake will not only be good, it’ll be memorable!
Time Details for Red Velvet Poke Cake
Creating a delectable red velvet poke cake is as much about the journey as it is about the destination. Understanding the time commitment can help you plan a perfect bake.
Preparation Time
Preparation for this cake takes about 20 minutes. This includes gathering your ingredients and getting everything ready for mixing and baking.
Cooking Time
The cooking time is quite manageable at 30 minutes. You’ll be amazed how quickly your oven transforms that batter into a beautifully baked treat.
Total Time
In total, you should set aside about 50 minutes to make this red velvet poke cake recipe. Not only will you enjoy the process, but your patience will be rewarded with a delicious dessert that’s perfect for any occasion. Be ready for compliments!

Nutritional Information for Red Velvet Poke Cake
When diving into the delightful world of red velvet poke cake, knowing its nutritional profile can help balance your indulgence with health. Here’s a closer look at what this cake offers.
Calories
A typical serving of red velvet poke cake contains approximately 350 calories. This figure can vary based on portion size and specific ingredients used.
Protein
This cake isn’t just a pretty face! Each slice packs about 4 grams of protein, primarily from the eggs and cream cheese used in the filling. This helps contribute to its rich and satisfying texture.
Sodium
With around 250 mg of sodium per slice, it’s wise to be aware of your overall intake, especially if you’re enjoying it alongside savory dishes. Balancing is key, and this sweet treat can easily fit into a well-rounded diet.
Understanding the nutritional value behind the red velvet poke cake recipe allows you to enjoy every bite while being mindful of your health, making your dessert experience all the more gratifying.
FAQs about Red Velvet Poke Cake
Red Velvet Poke Cake is a delightful twist on the classic flavors that evokes memories of celebrations and indulgent desserts shared with friends and family. As you embark on this culinary adventure, you might find yourself pondering a few questions about this mouthwatering dessert. Let’s dive into some common inquiries!
How long can I store the Red Velvet Poke Cake?
If you manage to have leftovers (which might be a stretch, considering how delicious it is), you can store your Red Velvet Poke Cake in the refrigerator for up to four days. Just be sure to cover it tightly with plastic wrap or foil to keep it moist. Alternatively, if you wish to indulge later, you can freeze individual slices for up to three months. Just thaw them in the fridge overnight, and they’ll be ready to enjoy again.
Can I make this cake gluten-free?
Absolutely! To make your Red Velvet Poke Cake gluten-free, simply substitute regular all-purpose flour with a gluten-free all-purpose blend. Many of these blends work seamlessly as a 1:1 replacement, allowing you to enjoy the same gooey and delicious texture without missing out on flavor.
What are some variations of Red Velvet Poke Cake?
The beauty of Red Velvet Poke Cake lies in its versatility. Here are a few ideas to spice things up:
- Flavor Additions: Try mixing in chocolate chips or nuts for added texture.
- Frosting Options: Swap out cream cheese frosting for whipped cream or even a rich chocolate ganache.
- Fruit Accents: Layer fresh berries or add a fruit filling between the cake and frosting for a refreshing twist.
Feel free to experiment and make this cake your own! Enjoy every bite.
Conclusion on Red Velvet Poke Cake
Indulging in a red velvet poke cake feels like a celebration in every bite. This cake not only dazzles with its vibrant color but also captivates your taste buds with layers of flavor and texture. Whether you’re planning a festive gathering or simply craving something sweet, this dessert is bound to impress. Its moistness and creamy filling turn any occasion into a special one. Remember, the beauty of this recipe lies in its simplicity; it’s easy to make yet stunning enough to serve to guests. Enjoy making this delightful treat—your friends and family will be reaching for seconds!
Print
Red Velvet Cake
- Total Time: 8 hours 50 minutes
- Yield: 12 servings 1x
- Diet: Vegetarian
Description
A delicious and moist red velvet cake topped with cream cheese frosting and mini chocolate chips.
Ingredients
Scale
- 1 box red velvet cake mix
- 3 eggs (oil, water, etc. as per package directions)
- 14 oz Sweetened Condensed Milk
- 8 oz Cream Cheese (softened at room temperature)
- 1/4 cup unsalted butter
- 2 cups Powdered Sugar
- 2–3 Tbsp Milk
- 1/2 tsp Vanilla Extract
- 1 cup mini chocolate chips
Instructions
- Preheat oven to 350 degrees F.
- Make cake mix according to package directions and bake in a well-greased 9×13 pan according to package.
- Allow to cool for about 10 minutes, then poke holes all over cake (about 1-inch intervals) using a wooden spoon handle.
- Pour the sweetened condensed milk over the top of the cake.
- Cover and refrigerate the cake overnight.
- To make the frosting, beat together cream cheese and butter until combined.
- Add powdered sugar and 1 tablespoon milk and vanilla. Beat together until well-combined.
- Mix in additional milk to the desired consistency.
- Spread frosting over room temperature cake and top with the mini chocolate chips.
- Enjoy at room temperature, or chill and enjoy cold.
Notes
- For extra moisture, ensure the cake is refrigerated overnight after adding the sweetened condensed milk.
- Feel free to adjust the amount of milk in the frosting to reach your preferred consistency.
- Prep Time: 20 minutes
- Cook Time: 30 minutes
- Category: Dessert
- Method: Baking
- Cuisine: American
Nutrition
- Serving Size: 1 piece
- Calories: 350
- Sugar: 35g
- Sodium: 250mg
- Fat: 18g
- Saturated Fat: 10g
- Unsaturated Fat: 6g
- Trans Fat: 0g
- Carbohydrates: 45g
- Fiber: 1g
- Protein: 4g
- Cholesterol: 80mg